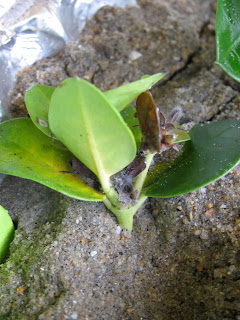
On a previous post I explained how I sterilized sand. If you haven’t seen that post you might want to glance over it. Well that is if you want to try your own experiment but if you are not.. then read on my friend read on… Oh just to let you know after I started this experiment I read that beach sand is not ideal for rooting a cutting. So I thought I could have started over but my stubbornness got the best of me. So I proceeded with the beach sand.

With this experiment I used an aluminum tray that I found laying in the street. With some soap and water I was able to clean it nicely. This is where I placed the sand and prepared it for the rooting experiment. Don’t forget to pop a couple of holes at the bottom of the tray. This will help drain the water when you do water it.
 Here are the steps that I took to prepare the seedlings:
 1 – Cut a couple of pieces from the plant. You will want about a few inches of the plant. You’ll want to cut right where the leaves are growing out.
2 – From the area that you made your cut, clear the bottom of the stem from the leaves but saving a few at the opposite end.
3 – Then you’ll want to burry the cleared section into the sand.
4 – Wait.
Well good job. You’re ready for the make shift green house. I got the idea from a video, which I’ll post a link too. But basically I used a white trash bag and a couple of spoons that I used from my plenty visits to the local frozen yogurt shop. I used the spoons to help prop the plastic bag. So the bag does not just lay on the plants itself.
Once you planted the cuttings, you’ll want to water the sand. Do not over water the plants. You’ll want it moist and not soaked.
Place the tray into the plastic bag and tie it up. Place it where it will not be bothered. I placed it in an area where it’s mostly shaded but it does get some sun. Now just wait.
As for week 01:
The plants haven’t rooted yet. From the photos you can see how moist the plants are.
Week 02:
No roots for this week. The stems have turned a dark brown.
Week 03:
No luck this week.
This stem looks like it’s a goner.
I left the experiment alone for a couple of weeks. I felt that I was disrupting the rooting process due to my constant pulling the plant out. So after a couple of weeks I did a quick check up. Here are the photos:
Did you just see that? You may be asking what you are looking at or what am I looking for? It’s a white little root growing from the stem! Yes! Success! It actually rooted and it is growing.
When I pulled the first one, I saw something that wasn’t there before. So I looked closer and noticed that it was a small root. Sad thing I placed it back into the sand I felt a slight tug and I noticed the root had been broken off.
The 2nd stem when I pulled I felt it was well rooted into the sand. So I tugged and heard a crack. My guess is that I had broken off a couple of roots but luckily there were a couple of roots still.
My lesson… I have to be careful! Well I hope you enjoyed the read. I’ll keep everyone updated with these guys.
Here is that link to the video I used as reference:
MikesBackyardNursery


No comments:
Post a Comment